Year of the Dragon: Through May 28th, claim free Expansion Pack (excluding Vecna Unleashed) or a Greater Elixir of Discovery! Speak to Xatheral in the Hall of Heroes.
Known Issue: Xatheral has been temporarily disabled while we investigate a bug with Year of the Dragon gift delivery.DDO Forums edit
Game mechanics • Newbie guide • In development • DDO Store • Social Media
Challenges • Classes • Collectables • Crafting • Enhancements • Epic Destinies • Favor • Feats
Glossary • Items • Maps • Monsters • Places • Quests • Races • Reincarnation • Skills • Spells
Please create an account or log in to build a reputation and unlock more editing privileges, and then visit DDO wiki's IRC Chat/Discord if you need any help!
Tomb of the Shadow Guard
| Tomb of the Shadow Guard is the 1st quest in the Litany of the Dead Part 2 story arc Completing everything in a story arc often yields a nice reward.. |
|---|
| The first four quests can be completed in any order to unlock The Shadow Crypt. |
| Tomb of the Shadow Guard • Tomb of the Shadow King • Tomb of the Shadow Knight • Tomb of the Shadow Lord • The Shadow Crypt |
The Shadow Guard's Tomb has collapsed into several flooded tunnels. Staying dry will be nigh impossible.
|
| Tomb of the Shadow Guard | |
| Heroic level: | 8 |
| Epic level: | None |
| Duration: | Long |
| Heroic XP: | ♣2,133Solo/Casual ♦3,772Normal ♥3,988Hard ♠4,204Elite |
| Epic XP: | N/A |
| Takes place in: | Tomb of the Shadow Guard |
| Bestowed by: | Bragdii Wyvernborne |
| NPC contact: | Bragdii Wyvernborne |
| Quest acquired in: | The Necropolis |
| Patron: | The Silver Flame |
| Base favor: | 5 |
| Purchase: | The Necropolis, Part 2 or VIP |
| Extreme Challenge: | No |


Overview
Enter the Tomb of the Shadow Guard and traverse through the ruins and submerged caves. Dispatch the Mummy Prince Kamenwati and his followers.
- This is one of the quests required to get flagged for The Shadow Crypt of The Necropolis, Part 2.
Spoiler Warning: Spoiler material below this point!
Objectives
- Slay Janos Porthak
- Slay Tirnan Wentarg
- Slay Kervan Naret
- Slay Kamenwati
- (Optional) Slay Invisible Stalker — Bonus (20%): Heroic( ♣427 ♦754 ♥798 ♠841 )
What to Expect
- Overlapping floors
- Only 1 shrine (half-way through, and off direct path)
Known Traps
- Floor spikes (location varies)
Tips and Misc
- Despite appearances, this is a simple but long quest. With one exception (and a couple short dead-end side tunnels), the path from the entrance to the end is entirely linear.
- In Map 1, the white numbers are before the split (see below), the red are the optional detour, and the aqua are after the split. In Map 2, the red paths are above-water, the blue underwater.
- Useful spells: Resist Electricity, Fire, Water Breathing (Divine).
- Bring your Underwater Action equipment. You'll spend more than half of the time swimming inside long and flooded underground tunnels. A Water Breathing spell can work, however it is possible to get lost and spend several minutes underwater.
- Sogshadow Moss Patches can be found inside the water which will grant Water Breathing. However, each patch needs 3 minutes to "recharge" after being used by one person.
- Note that you can also obtain water breathing from many sources near this level. Potions of Water Breathing (ML:4) are available in House Jorasco and scrolls of the 3rd level spell Water Breathing can be obtained in House Phiarlan (UMD: 28). If you have 75 favor with House Phiarlan, for a flat 500 GP (50 PP), Fingalar d'Phiarlan will cast a 30 minute Water Breathing spell on you. Other options are the one time use item from Korthos (the Ring of Waterbreathing), or the Boots of the Mire from Fathom the Depths (in The Red Fens). Another option is the Level 8 (or higher) Ring of the Buccaneer from the Treasure of Crystal Cove event.
- The underwater tunnels have many short but misleading dead ends, so you will want to keep up with your group mates; a careless wrong turn can very much mean that you'll become lost and stray from your group for the rest of the adventure. If you follow the lighted path (mushrooms, glowing fish and surface light) you can find your way fairly easily.

- Once you reach the drop down point past/SW of the first (far eastern) chest (#7 on 1st map, above), the path splits: the southern path will lead you to the Invisible Stalker optional, while the northern path will lead you to the end boss eventually and finish the quest (see picture to the right).
- The shrine you see upon reaching drop-point 15, is actually accessed during the swim between 7 and 8 (main path). Shortly after entering the water, you should swim by two large purple crystals. Surface, if not already and the ramp-way will begin to your right. There is a small jump required that will be difficult for characters with low jump/movement speed boosts. A character with 8 Jump and 20% speed can barely make the jump. (Note: In the past it was possible to use the shrines through the bars at drop 15, however that is no longer the case.)
- The end fight is actually right next to the quest entrance, so Dimension Door will help greatly in case you are lost but your group is able to reach the boss. That said, you cannot complete the initial bosses then Dimension Door to fight Kamenwati; you have to swim to him and kill him, then the door will open to allow your Dimension Door using party members to reach the boss room.
- Quick guide (use it in combination with the Wiki map):
- 1 - 6 (white) is the path from the entrance to the intersection
- 7 is the intersection
- 7 - 8 (south) is the optional path leading to the Invisible Stalker; backtrack to 7 afterwards
- 7 - 18 (north) is the main path leading to the end boss
Bonus XP
- Aggression bonus: 54 or more monsters killed +10% Bonus.( ♣213 ♦377 ♥399 ♠420 )
- Onslaught bonus: 62 or more monsters killed +15% Bonus.( ♣320 ♦566 ♥598 ♠631 )
- Conquest bonus: 78 or more monsters killed +25% Bonus.( ♣533 ♦943 ♥997 ♠1,051 )
- Tamper bonus: 1 or more trap disarmed +10% Bonus.( ♣213 ♦377 ♥399 ♠420 )
- Mischief bonus: 19 or more breakables smashed +8% Bonus.( ♣171 ♦302 ♥319 ♠336 )
- Vandal bonus: 25 or more breakables smashed +10% Bonus.( ♣213 ♦377 ♥399 ♠420 )
- Ransack bonus: 32 or more breakables smashed +15% Bonus.( ♣320 ♦566 ♥598 ♠631 )
Loot
- Chests: 4
- One for each of the "Slay" objectives
- Collectables: 8
- Mushroom early in the second swim
- Mushroom early in the third swim
- 4 Mushrooms about halfway along the swim to the optional chest
- Mushroom on the first swim after Tirnan Wentarg
- Mushroom on the first swim after Kervan Naret (just before the end fight)
- NPC rewards: Random item
Monsters
| Name ( picture ) | CR | Type | Race |
|---|---|---|---|
Dread Wraith ( view |
♠18Elite ●♦25Epic Normal ●♠34Epic Elite | Undead | Wraith |
Drifting Scourge Mage ( view |
♦9Normal ♥11Hard ♠14Elite | Undead | Spectre |
Drifting Scourge ( view |
♦8Normal ♥10Hard ♠13Elite | Undead | Spectre |
Dun Butcher ( view |
♦8Normal ♥10Hard ♠13Elite | Humanoid | Human |
Fated Revenant ( view |
♦8Normal ♥10Hard ♠13Elite | Humanoid | Human |
Gloomstreaker ( view |
♦8Normal ♥10Hard ♠13Elite | Humanoid | Human |
Invisible Stalker ( view |
♦10Normal ♥12Hard ♠15Elite | Elemental | Invisible Stalker |
Janos Porthak ( view |
♥12Hard ♠15Elite | Undead | Spectre |
Kamenwati ( view |
♦10Normal ♥12Hard ♠15Elite | Undead | Mummy |
Kervan Naret ( view |
♦10Normal ♥12Hard ♠15Elite | Undead | Wraith |
Phase Spider ( view |
♦7Normal ♥9Hard ♠12Elite | Magical Beast | Spider |
Shadow (Mabar) ( view.jpg) |
♦7Normal ♥9Hard ♠12Elite | Undead | Shadow |
Shrouded Terror Mage ( view |
♦9Normal ♥11Hard ♠14Elite | Undead | Wraith |
Shrouded Terror ( view |
♦7Normal ♥9Hard ♠12Elite | Undead | Wraith |
Tirnan Wentarg ( view |
♦10Normal ♥12Hard ♠15Elite | Undead | Shadow |
Twilight Channeler ( view |
♦8Normal ♥10Hard ♠13Elite | Humanoid | Human |
Umbral Worg ( view |
♦8Normal ♥10Hard ♠12Elite | Undead | Shadow |
External Links
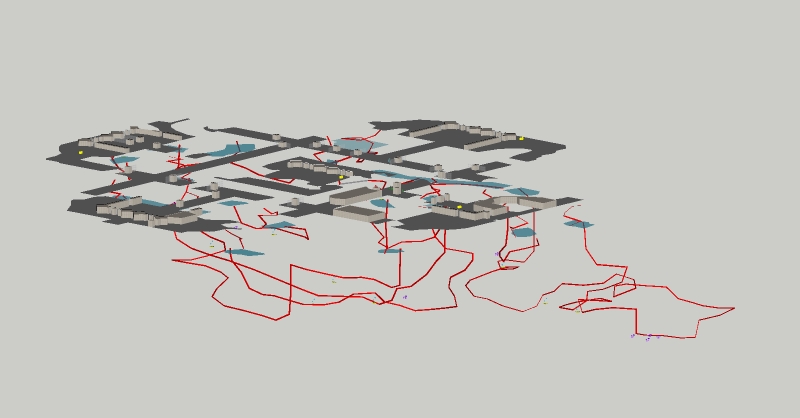
- This thread on the DDO Forum has some very good maps with pathing for this confusing quest
- CuriousGIS's 3D Sketchup map of Tomb of the Shadowguard pic 1 pic 2
- U30 Video Solo Walkthrough
- Litany of the Dead Part 2 chain quests
- The Necropolis, Part 2 quests
- Long quests
- Tomb of the Shadow Guard quests
- The Necropolis quests
- The Silver Flame patron quests
- Pay to Play quests
- Quests by name
- Compendium:Level 8 quests
- Level 8 quests
- Quests with 5 base favor reward
- Quests with maps
- Quests with more than one map
- Pages sourced by DDO forums
- Links to YouTube
DDOwiki maintenance categories
DDOwiki meta > DDOwiki metacategories
DDOwiki metacategories
Root > DDO game guides > Maps > Quests with maps
Root > DDO game guides > Maps > Quests with more than one map
Root > DDO library
Root > DDO meta
Root > DDO meta > DDO Official
Root > DDOwiki meta
Root > DDOwiki meta > DDOwiki metacategories > History
Root > DDOwiki meta > DDOwiki metacategories > Quests > Pay to Play quests
Root > DDOwiki meta > DDOwiki metacategories > Quests > Quests by adventure pack > The Necropolis, Part 2 quests
Root > DDOwiki meta > DDOwiki metacategories > Quests > Quests by duration > Long quests
Root > DDOwiki meta > DDOwiki metacategories > Quests > Quests by favor reward > Quests with 5 base favor reward
Root > DDOwiki meta > DDOwiki metacategories > Quests > Quests by level > DDO Compendium
Root > DDOwiki meta > DDOwiki metacategories > Quests > Quests by level > Level 8 quests
Root > DDOwiki meta > DDOwiki metacategories > Quests > Quests by location > The Necropolis quests
Root > DDOwiki meta > DDOwiki metacategories > Quests > Quests by name
Root > DDOwiki meta > DDOwiki metacategories > Quests > Quests by patron > The Silver Flame patron quests
Root > DDOwiki meta > DDOwiki metacategories > Quests > Quests by story arc > Litany of the Dead Part 2 chain quests
Root > DDOwiki meta > DDOwiki metacategories > Quests > Quests by zone > Tomb of the Shadow Guard quests
Root > DDOwiki meta > External links > Pages sourced by DDO forums
Root > DDOwiki meta > External links > YouTube links > Links to YouTube